Instructions for your checkbox

Welcome!

Start your at home test and receive your results within 3 working days in your personal health account.
Do the finger prick before breakfast and don’t eat and drink after 11pm the night before. Put it in your diary. It takes on average 15 min. Simply return the test to us in the same cardboard box in which it was delivered. 

On this webpage you’ll find all the instructions for using your checkbox:
Finger prick instructions
and /or
Urine test instructions
Shipping instructions

Finger prick

Watch the instructional video below before performing the home test – finger prick. Questions? Read the frequently asked questions below or contact our service desk via info@persoonlijkegezondheidscheck.nl.

Proper preparation is important to stimulate blood flow and thus make blood collection easier. Put the items from the bag in front of you. Also grab a tissue or piece of kitchen paper. In the bag you will also find a tape measure to measure your abdominal circumference. You will not need this for the finger prick.

Contents for the finger prick are the lancet, band-aid, tube and shipping bag

In this video we show you how the finger prick is performed. English subtitles are available. Attention: This video contains blood.

Step-by-step instructions

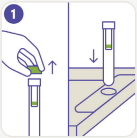
1. Prepare the tube

Pull the green cap off the tube. Attention: do not twist! Place the tube upright in the perforated hole in the lid of the shipping box.

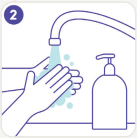
2. Wash your hands

Wash your hands with warm water and soap until your fingers feel warm.

step3

3. Warm your hand

Choose the hand with which you do not write for the finger prick. Warm this hand on a glass or cup of warm water for 2 minutes.

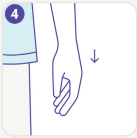
4. Let your hand hang down

Let your hand hang down for 1 minute to stimulate the blood flow.

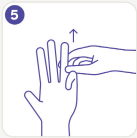
5. Massage your finger

Choose the finger you want to prick. Your ring finger and middle finger are the least sensitive. Massage your finger from the palm of your hand to your fingertip.

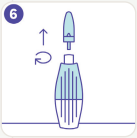
6. Take the cap off the lancet

Remove the blue cap from the lancet by twisting it upwards.

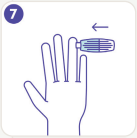
7. Prick

Place your hand on the table. Press the lancet firmly against the side of your fingertip, this is the least sensitive spot. You will now feel a small prick.

bloodtube step 8

8. Collect blood in the tube

Hold your finger pointing downward above the tube. Gently massage the finger from top to bottom until a drop of blood is formed. Collect the drops in the tube until the arrow on the barcode label reaches 0.3 ml.

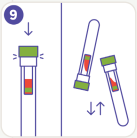
9. Close the tube

Press the green cap onto the tube. Gently move the tube up and down to mix the blood.

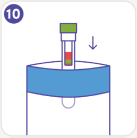
10. Place the tube in the bag

Place the tube in the plastic bag with the blue rim. Pull the strip off the bag to reveal the adhesive edge and seal it shut. Continue with shipping instructions below.

Urine test

Read the instructions carefully before performing the test.

Performing the test will cost you about 5 minutes. Take the items from the bag and place them in front of you.

Contents for the urine test are the urine container, straw, tube and shipping bag

Step-by-step instructions

1. Open the urine container

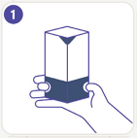
Take the urine container and unfold it by pressing the white circles. Make sure the bottom slides together properly.

2. Urinate in the container

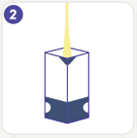
Go to the toilet and urinate in the urine container until it is at least half full of urine.

3. Prepare the tube

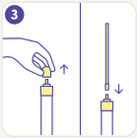
Pull the cap off the tube. Keep the cap nearby. Then place the straw on the tube.

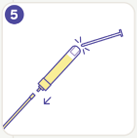
4. Collect urine from the container

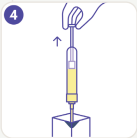
Draw the urine out of the urine container by pulling the rod attached to the tube. Fill the tube up completely.

5. Break off the rod

Break off the rod and remove the straw. These can now be thrown away in the trash.

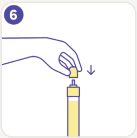
6. Close the tube

Push the cap back onto the tube. Check that the tube is closed properly.

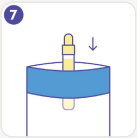
7. Place the tube in the bag

Place the tube in the plastic bag with the blue rim. Pull the strip off the bag to reveal the adhesive edge and seal it shut. Continue with shipping instructions below.

Shipping instructions

Step-by-step instructions

1. Place the test in cardboard box

Place the bag with the tube in the box. If you have also done the urine test, place this bag in the box as well.

2. Close the box

Close the box with the closing tab on the front. Shipping is completely free.

3. Send by post

Send the box by regular post. Is it colder than 4 degrees or warmer than 25 degrees outside? Then send the box in a postbox at a PostNL point.

Frequently Asked Questions

View all questions